UP TO THE MINUTE
4 Steps to Installing Metal Roofing Over Plywood
By RPS Metal Roofing & Siding Inc.
Most metal roofing jobs will have you installing panels over plywood. Here’s how to get the job done right!
Metal roofs are one of the strongest and most reliable materials to use on a home. When installed correctly, they do not require much maintenance in the future. Most metal roof installations will be on top of plywood substructures so it’s important to know how to get it just right. Here are four steps to take when installing metal roofing over plywood:
1 - Inspect the plywood
Installing a metal roof on a home is a sensible idea; it protects the wooden substructure in all weather conditions and reduces maintenance costs in the long term. The first thing to do is remove the existing roof and inspect the plywood underneath. Some of it might need replacing.
Inspect the existing plywood and look for signs of rot and water damage. Chances are some sections will need to be replaced, but not all of them. If you replace sections of plywood, make sure it conforms to the standard of the American Plywood Association for quality assurance.
If the plywood conforms to the commercial standards, it will include an APS stamp; this is important to have to ensure that the substructure is reliable. Once you replace the plywood, make sure it is free from dust, debris and other contaminants, as well as pipes and protrusions.
2 - Apply the underlayment
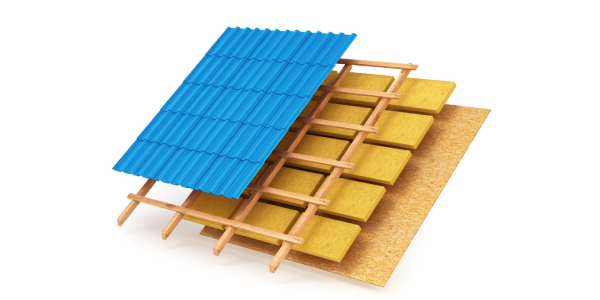
Between the outer metal layer of the roof and the plywood base, there is a sheet of protective material called the underlayment. This sheet is normally made from felt, asphalt or polymer and is fundamental to the long-term success of a homeowner’s new metal roof.
The task of the underlayment is twofold; firstly, it protects the plywood from rotting and contamination; secondly, it directs water and precipitation away from the plywood in the direction of drainage. Talk to a professional about the best underlayment for the type of roof you need.
Underlayment is very easy to install; all you have to do is roll out the covering on the roof and cut it to size with a roofing knife. When you have the correct size and dimensions, use half-inch roofing nails to secure the material to the plywood. This should provide effective protection.
3 - Apply slipsheet
A slip sheet is installed on top of the underlayment to protect it from tearing. If you intend to install a metal roof, you need to be ready for the expansion and contraction of the metal during different seasons. These changes can damage the underlayment and then the plywood.
A slip sheet is made from rubber or plastic; it is installed on top of the underlayment and underneath the metal. It is easy to install; all you have to do is roll out the sheet and find the dimensions, then secure the sheet to the underlayment surface with nails.
When the metal roof invariably expands and contracts in the winter and summer months, the underlayment and the plywood are suitably protected thanks to the slip sheet. This additional layer of protection keeps the roof dry and secure, reducing the cost of short-term maintenance.
4 - Install roof
Once you have prepared the plywood base and covered it with the underlayment and slip sheet, it’s time to start laying the metal panels and securing them with galvanized metal screws. Start at the bottom left side of the roof at the eaves and work your way along to the right-hand side.
Make sure the metal panels overlap the roof and the eaves by one inch before securing them. When you have the base of the roof covered, it’s time to layer the sheets moving to the top. Each row of panels should overlap the previous one by twelve inches and be secured with screws.
The metal panels should overlap each other by 12 inches to ensure there is no water leakage. Ensure this is the case whether you install the panels vertically, horizontally or in combination. If the is any excess metal, cut it away using metal snips.
Learn more about RPS Metal Roofing & Siding in their MetalCoffeeShop™ Directory or visit www.rpsmetalroofing.com.
Original article: RPS Metal Roofing & Siding












Comments
Leave a Reply
Have an account? Login to leave a comment!
Sign In