UP TO THE MINUTE
Everything You Need to Know About Virtual Roof Inspection Costs
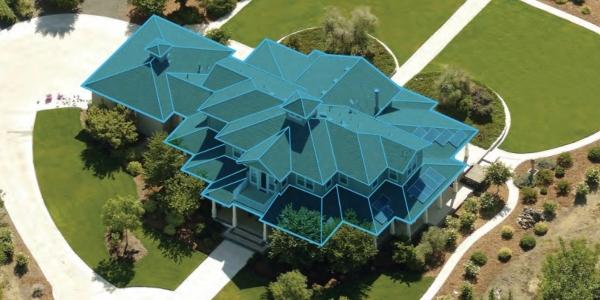
How to use virtual inspections to improve your closing rates.
Let’s be honest: getting up on the roof is a dangerous job. As technology advances to make rooftop inspections easier, quicker, more accurate and safer it becomes clearer that there is a better way to get the job done with no ladder required. Virtual roof inspections give roofers a bird-eye’s view of the jobsite with accurate measurements and 3D modeling thanks to aerial imagery like EagleView. The real question isn't if virtual inspections are worth it, it’s whether you can afford not to implement these techniques into your business.
How much virtual roof inspections cost
When it comes to virtual roof inspections, some contractors still prefer to visit the job site to capture measurements. This helps them build a customer relationship, but often times, the cost of scheduling, rolling a truck and deploying a production crew to capture measurements on a roof top, incurs significant cost and project delays. Many contractors imagine a drone flying over a house and taking pictures, which saves time in climbing ladders and manually taking measurements. And while that’s a viable option, it’s no longer the fastest or most cost-efficient.
These days, drones are typically only needed for insurance adjusters who need to assess damages at close range. For the vast majority of roofing projects, aerial imagery is now considered the gold standard.
Why use aerial imagery for roof inspections?
There are several advantages aerial imagery brings to roof inspections — greater accuracy, improved complexity, increased safety and reduced inspection time. Let’s dig into each one a bit more…
Accuracy matters more than anything else
Whether it’s due to human error or imprecise imagery, inaccurate inspections are a waste of time and money for everyone involved. Roofers lose jobs to the competition, homeowners get frustrated and bail on projects, and companies order too much (or too little) material.
However, virtual roof inspections using aerial imagery, provide the most complete and precise data capture possible. In fact, EagleView’s imagery has the highest resolution possible, with each pixel equaling 0.75 square inches on the ground.
We actually own and operate a fleet of airplanes with proprietary sensor technology that’s designed specifically for capturing property details at the highest accuracy and precision available.
And we’ve spent the past two decades patenting and perfecting our oblique image capture technology, which delivers 70x that of satellite imagery. Not sure what the heck “oblique image capture” means? Read more about this in our article on orthogonal vs oblique imagery.
Scott Riopelle, CEO and owner of Interstate Roofing, says, “We’ve saved millions over the years by using EagleView, and that’s only looking at the savings of always ordering the correct amount of roofing material. I can’t even imagine how much it is when you look at the time savings, the additional jobs won, and avoiding worker’s compensation costs.”
The complexity of roof structure
As anyone in the roofing industry can attest, roofs are not simple structures with nice and easy flat panes. They’re complicated beasts with a variety of obstructions like chimneys, skylights, valleys, eaves, rakes and more.
Accurate measurements must account for these obstructions while also factoring in things like total area and predominant pitch.
This complexity leads to a high rate of human error when doing physical inspections. And satellite imagery is often not clear enough to detect such details, leading to imprecise measurements and reporting.
Aerial imagery, on the other hand, is able to capture this complexity easily — providing you with accurate and dependable data for your inspection report.
Safety of life and body parts
The hard truth is that every time an employee climbs on a roof, it’s just an accident waiting to happen. The fatality rate for roofers is roughly 15 times higher than the average, according to the Bureau of Labor Statistics, with roofing accidents accounting for 111 of 5,333 fatal injuries in 2019.
Only three other occupations have a higher fatality rate than roofing — fishing and hunting, logging and aircraft pilots and flight engineers. (Even police officers have a lower fatality rate than roofers.) And in the era of COVID-19, on-site visits carry the additional risk of exposure to the virus.
So, decreasing the number of times you or your employees have to visit a site or climb up on a roof is a no-brainer. Not only can it save lives, but decreasing the risk of injury improves productivity and reduces the total cost of inspections and claims.
And aerial imagery takes this risk completely off the table, providing a completely virtual (and ladder-free) inspection.
Reduces inspection time
Virtual roof inspections are faster because you don’t need to get up on the roof first. This eliminates the time spent on the roof, of course, but also time spent coordinating appointments with homeowners and driving around to different property sites.
With aerial imagery, the entire process is fully automated and incredibly detailed. EagleView’s reports, for example, allow you to virtually review a single roof down to the individual facet details using multiple high-resolution images and 3D modeling — all from the comfort of your own desk.
And because aerial images are so accurate, you can confidently assess properties the first time, eliminating the need for expensive and time-consuming secondary inspections.
Plus, not only are virtual inspections faster than physically climbing up on a roof, but they’re also faster than using drones. With aerial imagery, the images have already been taken and are ready for you to download on the spot — similar to satellite imagery.
Drones, however, are used on a roof-by-roof basis. So you have to schedule a time to have the drone fly over the property before having access to any imagery or reports.
Now that you have a basic understanding of virtual inspections and aerial imagery, let’s walk through the process from beginning to end, so you know what to expect.
Step 1 - Select the right roof inspector vendor or expert
With advancements in technology, there are a lot of choices out there when it comes to aerial imagery vendors. Everyone’s throwing their hat in the ring lately. However, that doesn’t mean all choices are created equal.
So when selecting a virtual roof inspector vendor, you’ll want to consider the following:
-
How long have they been in the field?
-
Do they use satellite, aerial or drone imagery?
-
What type of technology are they using to capture the images?
-
What viewpoints do they use? Orthogonal or oblique?
-
How accurate are their images, and what is the resolution?
-
If they’re using drones, are they flown manually or automatically?
-
What type of customer support do they offer?
-
What is their reputation within the industry?
Step 2 - Tell them what you’re trying to achieve
Virtual roof inspections are used for a variety of purposes, from providing insurance assessments to roof replacement estimates. And each has its own specific needs and requirements.
If you’re using the inspections to create estimates for homeowners, for example, you need high-quality images and 3D modeling that can be easily translated into measurements. And you need to use the measurements to calculate the cost of materials and labor.
So, make sure to tell your vendor exactly what you need to achieve with the virtual inspection and verify whether they’ve done similar work in the past. You’ll also want to tell them what you need to see in the report to ensure you’ll get the data you need.
Step 3 - Review their processes for capturing images and sending reports
Once you’ve chosen a vendor and explained what you need, the next step is to carefully review their processes. For images, you’ll want to ask how often they update their images and data.
At EagleView, for example, we continuously update our images and data, re-photographing areas on an ongoing basis to capture property changes. This is especially important for roofing estimates that are based on the condition of the existing roof.
If images aren’t updated frequently, the roof inspection results could lead you to erroneously tell a homeowner that they can just replace some shingles instead of re-shingling the entire roof. Then when you get up there to do the job and see the actual condition of the roof, you’ll have a hard time explaining why they need to spend a lot more money.
And when it comes to reports, you’ll want to find out how long it takes from the time you order to the time it hits your desktop. The faster you receive the report, the faster you can get an estimate out to a homeowner — potentially beating out the competition. (As a point of reference, standard EagleView reports are typically available in less than an hour.)
Step 4 - Get clarity on what exactly you’ll be getting from their roof report
Speaking of reports, the next step is getting clarity from the vendor on exactly what you’ll see on their roof report. Ideally, they can provide you with a sample report that will show you what to expect.
EagleView’s reports, for example, include the property address and report number on the top of every page. The first page includes the 3D model from which all the measurements are derived, along with a summary of major measurements. These include total roof area, total roof facets, predominant pitch, number of stores, total ridges/hips, total valleys, total rakes and total eaves.
Our report also includes aerial imagery of the property, helping you identify drop points for supplies and potential trouble areas before ever setting foot on site. And it includes a pitch diagram that helps explain the complexity of the project when it comes to added costs.
EagleView reports also determine the waste factor based on square footage and the number of facets to help plan the job efficiently. The waste calculation feature estimates the percentage and square footage of waste produced from each job — excellent for determining what size dump trailer you’ll need.
And the report summary at the end gathers all the information in one place to help you create your estimate. It lists the property’s unique features and complexities and summarizes linear measurements and the number of roof features.
Step 5 - Order your report and create an estimate
Once you’re satisfied with the chosen vendor, the final step is to order your report. Typically, this is as simple as setting up an online account with the vendor and providing the address of the property.
Then you just sit back and wait. (Ahhhhhh, so much better than climbing up on a hot roof…) When the report hits your desk, you can use the measurements to calculate material and labor costs, and then send an estimate right to the homeowner.
Many reports include features that can be used to supplement your estimate. For example, EagleView’s premium reports also include a Property Owner Report you can send to the homeowner. It includes things like the notes diagram (shown above) that can be useful when discussing the job with the homeowner.
Property owner reports also make your estimate stand out as impressive and professional compared to the competition. Aggi Hall, market development manager at Hippo Roofing, explains that “EagleView makes the homeowner say ‘you’re the expert’ and helps set us apart from other roofers.”
“The EagleView report gets us awarded the job about 75% of the time,” continues Hall, “because you can clearly show homeowners the process every step of the way.”
EagleView reports can easily be integrated into industry-standard workflows like PDF and XML, which means no human errors, auto-data population, assembly line process, driving project compression and standardization. These benefits not only save costs, but build a foundation for automation, which leads to business scale and differentiation.
Learn more about EagleView in their MetalCoffeeShop™ Directory or visit www.eagleview.com.
Original article source: EagleView










Comments
Leave a Reply
Have an account? Login to leave a comment!
Sign In